Monday, May 31, 2021

Skillet Corn, Edamame, and Tomatoes with Basil Oil

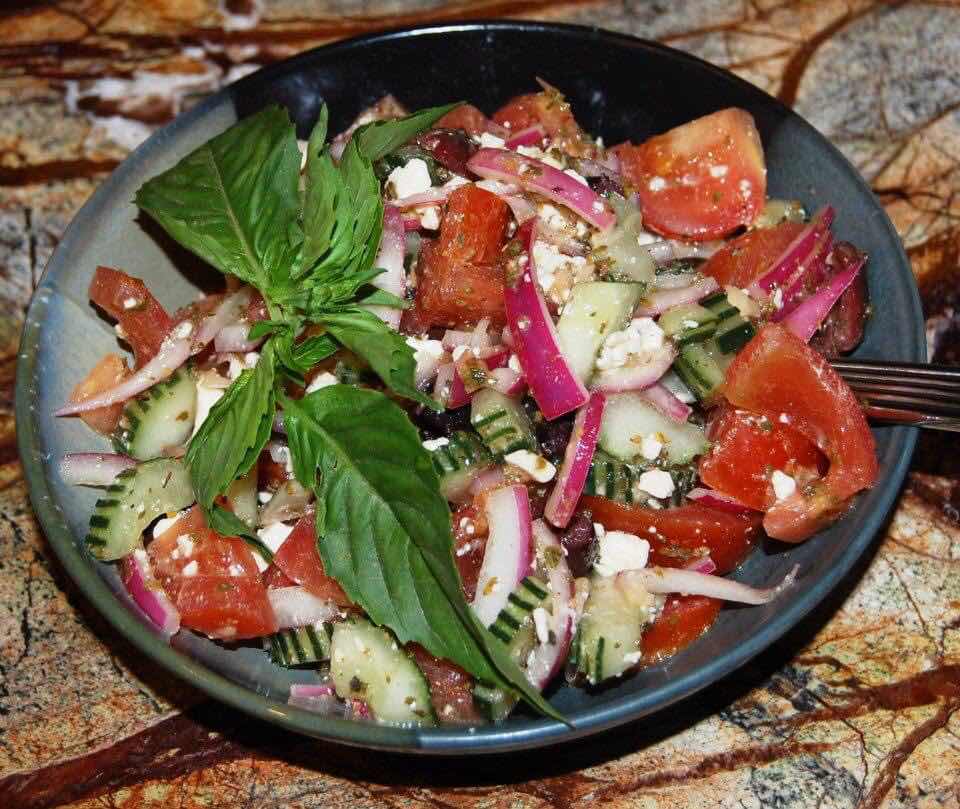
Every summer, when all the great vegetables are popping up and ready for the picking, this is our go to side dish at least once a week.  We also add diced zucchini and yellow squash to it to change it up.

Skillet Corn, Edamame, and Tomatoes with Basil Oil
Ingredients
  1 cup fresh basil leaves
  ¼ cup plus 2 tablespoons extra-virgin olive oil, divided
  1 ½ teaspoons coarse salt, divided
  ¼ cup finely sliced scallions (from 4 scallions)
  1 ½ teaspoons minced garlic (from 3 small garlic cloves)
  3 ¼ cups corn kernels (from 3 ears)
  2/3 cup frozen shelled edamame, thawed
  ½ pound cherry tomatoes, halved (1 3/4 cups)
  2 tablespoons white balsamic vinegar
Directions
1. Bring a small pot of water to a boil. Add basil; cook 10 seconds. Transfer basil to a bowl of ice water, then drain, and squeeze dry. Puree basil, 1/4 cup oil, and 1/2 teaspoon salt in a blender or food processor until smooth.
2. Heat remaining oil in a skillet over medium-high heat. Add scallions and garlic; cook until fragrant, about 30 seconds. Add corn, edamame, and remaining salt. Cook, stirring, until starting to caramelize, about 10 minutes (reduce heat to medium if overbrowning). Add tomatoes and vinegar; cook until tomatoes start to collapse, about 8 minutes.
3. Drizzle basil oil on vegetables, and stir. Serve immediately.

Sunday, May 30, 2021

Green Chili Rice Bake with Chicken

A few years back, we visited a friend in Arizona.  She made a delicious side dish that I kept thinking of weeks later.  So I contacted her for the recipe, and adapted it to. Are it a main dish, by adding chicken.  As most of my recipes are, it’s quick and easy!  Enjoy!!


Green Chili Rice Bake with Chicken

Ingredients

  • 4 cups cooked rice
  • 2 (4 oz.) cans diced green chilies
  • 2 cups shredded chicken
  • 1 cup sour cream
  • 1 cups shredded Monterrey Jack or pepper jack cheese
  • 2 cups shredded cheddar cheese, divided
  • 1-2 tablespoons chopped fresh cilantro
  • 1/2 teaspoon salt
  • 1/4 teaspoon pepper
  • Dash of cayenne pepper (optional)

Instructions

  1. Preheat oven to 350 degrees. In a large bowl, combine rice and remaining ingredients, reserving 1 cup of the cheddar cheese for topping.
  2. Transfer the rice mixture to a greased 2 quart baking dish. Cover and bake for 25-30 minutes or until heated through. Remove from oven and sprinkle with the reserved cup of cheddar cheese.
  3. Place under the broiler for about 2 minutes, or until cheese is melted and bubbly. Garnish with additional chopped cilantro, if desired.


Thursday, May 27, 2021

Creme Brûlée

Do you just have “that dessert”?  Some people love a good pumpkin pie, to others it’s all about a cookie, or a decedent slice of chocolate cake. For my sister, it’s creme brûlée. While I may not have known this until her and my brother-in-law were helping with our condo remodel. We went out for dinner one night, when the dessert menu was passed around she commented that she loved Creme Brûlée.   


We were recently on a camping trip with them, while they were celebrating their wedding anniversary. I thought, why not make creme brûlée and bring it up on the trip. I mean why not bring a brûlée torch camping?


Creme Brûlée 


Ingredients

  • 1 extra-large egg
  • 4 extra-large egg yolks
  • 1/2 cup sugar, plus 1 tablespoon for each serving
  • 3 cups heavy cream
  • 1 teaspoon pure vanilla extract
  • 1 tablespoon orange liqueur (like Grand Marnier)

Directions 

  1. Preheat the oven to 300 degrees F.
  2. In the bowl of an electric mixer fitted with the paddle attachment, mix the egg, egg yolks, and 1/2 cup of the sugar together on low speed until just combined. Meanwhile, scald the cream in a small saucepan until it's very hot to the touch but not boiled. With the mixer on low speed, slowly add the cream to the eggs. Add the vanilla and orange liqueur and pour into 6 to 8-ounce ramekins until almost full.
  3. Place the ramekins in a baking pan and carefully pour boiling water into the pan to come halfway up the sides of the ramekins. Bake for 35 to 40 minutes, until the custards are set when gently shaken. Remove the custards from the water bath, cool to room temperature, and refrigerate until firm.
  4. To serve, spread 1 tablespoon of sugar evenly on the top of each ramekin and heat with a kitchen blowtorch until the sugar carmelizes evenly. Allow to sit at room temperature for a minute until the caramelized sugar hardens.


Monday, May 24, 2021

Thai Chicken Wraps

I love the flavors in Asian cooking.  So when I am motivated to make something quick and easy, and levitate towards cooking Asian faire.  


This is a dish I made on a hot summer day, that I knew we needed something flavorful and light.  


Typically this would be served in lettuce cups, but I opted to switch it up to a tortilla wrap.


Thai Chicken Wraps


Ingredients

  • 1 lb ground chicken
  • 1 tbsp olive oil
  • 2 tbsp red curry paste
  • 1 tbsp ginger, minced
  • 4 cloves garlic, minced
  • 1 red bell pepper, sliced thinly
  • 4 green onions chopped
  • 1 cup cabbage shredded or coleslaw mix
  • 1/4 cup hoisin sauce
  • 1/4 tsp salt (to taste)
  • 1/4 tsp pepper (to taste)
  • 5 leaves basil, chopped
  • 4-6 tortillas


Instructions

  1. Add olive oil to a large skillet and heat until oil is very hot. Add ground chicken and cook until no longer pink and starts to brown, break it up with a wooden spoon as necessary. Should take about 3 minutes.
  2. Add red curry paste, ginger, garlic, peppers, coleslaw mix, and stir-fry for another 3 minutes. Add hoisin sauce and green onions, and toss. Remove from heat then add basil and toss.Transfer cooked chicken to a bowl.
  3. Alternatively, place a tortilla on a cutting surface, place a cup or so of the mixture in the center of the tortilla, and fold both ends in, and roll to make a burrito style wrap.  We also added a small about of rice.  Cut in half, and serve


Saturday, May 22, 2021

Greek Tomato Salad

Having worked in a deli for many years, we made this in batches 30-40 pounds a day, at least.  It was one of our most popular salads.  The recipe is ingrained in my memory.  It’s one I pull out on a hot day, or when I don’t know what else to make.


This being said, we had a way of prepping the cucumber, that I have never seen anywhere else. You need one of those cheaper peelers. (See pictures)


Greek Tomato Salad

Ingredients

  • 1/4 cup red wine vinegar
  • 2 tablespoons olive oil
  • 1 garlic clove, minced
  • 1/2 teaspoon dried oregano
  • 1/8 teaspoon salt
  • 1/8 teaspoon pepper
  • 1 cup thinly sliced red onion
  • 4 tomatoes, wedged
  • 2 medium cucumber, lightly peeled halved and deseeded 
  • 6 kalamata olives, halved
  • 1/2 cup crumbled feta cheese

Directions

  1. In a bowl, whisk together the vinegar, oil, oregano, salt and pepper. Add red onion, toss to coat. Led sit for a few minutes to ease the sharpness of the onion.
  2. Stir in tomatoes, cucumber, olives and cheese. 
  3. Cover and refrigerate for at least 1 hour. Serve with a slotted spoon. 
  4. Yield: 5 servings.
How to prep cucumbers
  1. Wash the cucumber,
  2. Peel strips off the outside of the cucumber,
  3. Flip around the peeler scoop out the seeds
  4. Slice the cucumber into 1/2 moons.
    • If you want smaller pieces, cut the 1/2’s into 1/4’s


Thursday, May 20, 2021

Chicken Mushroom Pot Stickers

When you love to cook, you often get asked “what’s your favorite thing to Cook”.  That a hard questions.  I have so many favorites, but I usually reply, “a challenge”.  Making something that you love to eat, but not necessarily can/will make. This time, for me it was Potstickers.


Now, knowing that Craig likes Asian dishes, but doesn’t necessarily care for pot stickers. (I think it base on many having pork. But if they are homemade, I can put anything in them!!). I would say that the biggest challenge in making these was the time, not the folding, the prep work, or even the final cooking.


Over the time it takes to make these, you develop a sense of how to fold.  The first few will come out wonky, but after one or two, you’ll “get it”.  Just plan on pulling up a stool, and laying out wrappers, scooping, folding, repeating, 8,000 times.  When I stopped, I think I had make about 140, with 1/3 of the filling mixture left.  So I froze it to utilize some other way….maybe in Drunken Noodles???


Chicken Mushroom Potstickers


Ingredients

  • 35-40 ROUND Asian dumpling wrappers (about 3 1/2″ diameter)
  • 1 cup low sodium chicken broth, divided
  • Neutral oil (I used Avocado)

Filling

  • 1/2 head Napa cabbage(5 oz.), chunked to fit in food processor
  • 1/2 teaspoon salt
  • 3.5oz. pkg. shiitake mushrooms
  • 4 green onions, cut into 1 inch pieces
  • 1″ peeled ginger, peeled & chopped
  • 2 garlic cloves peeled
  • 1 large egg yolk
  • 12oz. ground chicken (or turkey)
  • 1 tablespoon reduced sodium soy sauce
  • 1 teaspoon rice wine vinegar
  • 1 teaspoon rice wine
  • 2 teaspoons toasted sesame oil
  • 1 teaspoon Sambal Oleck
  • 1/4 teaspoon pepper

Dipping Sauce (optional)

  • 3 tablespoons low sodium soy sauce
  • 1 1/2 tablespoons rice vinegar
  • 1 1/2 tablespoons rice wine
  • Chili paste to taste optional
  • Juice of 1/2 lemon

Instructions

Filling

  1. Add cabbage to food processor and process until fine. Add diced cabbage to a fine mesh sieve and toss with 1/2 teaspoon salt. Place over a bowl and let sit for 20-30 minutes then press cabbage down with a rubber spatula quite a few times to squeeze out any excess moisture. Set aside. (You can do part of this step in advance and leave the cabbage in the sieve in the refrigerator for as long as you like.)
  2. Add mushrooms, green onions, ginger and garlic to food processor (you don’t need to clean it out) and pulse until finely chopped. Add mixture to one side of a large bowl. To the other side of the bowl add egg yolk and whisk. Add cabbage, ground turkey and all remaining filling ingredients and mix with your hands until thoroughly combined. Cover with plastic and either freeze for 15 minutes or refrigerate at least 30 minutes (or up to 24 hours) to chill mixture.

Dumplings

  1. Line a baking tray with parchment paper and prepare some damp paper towels or a damp cloth (to cover assembled pot stickers and keep them from drying out). Keep all wrappers covered in plastic wrap when you are not using them. Fill a small bowl with water.
  2. Working with 2-4 wrappers at a time (depending on how fast you are), add 1 tablespoon filling to the middle of each wrapper. Do not overfill. Dip your finger in water and run it around the edge of HALF the wrapper. At this point you can either 1) Fold wrapper over in half to create a half-moon shape, pinch the edges firmly together to seal and create 4 pleats (see next step below).
  3. To create pleats: keep the back, moistened wrapper flat, and work with the front moistened wrapper (you are pleating just ONE side of the wrapper). Start with one side and work across to the other side. First, create one pleat with the front ummoistened wrapper by taking a small portion of dough, making a little fold and tucking it back. Firmly press completed pleat into back of wrapper to seal edges. Repeat for 4 pleats. 
  4. Place filled wrappers on prepared baking tray and cover with damp paper towels/cloth. Repeat with remaining wrappers.

Cook

  1. Place paper towels on a baking tray to place cooked potstickers. Heat 1 tablespoon oil in a large NONSTICK skillet (that has a lid) over medium-high heat.
  2. Add about 12 dumplings to skillet flat side down, enough that will comfortably fit. Cook without touching until the underside is lightly golden, approx. 2 minutes. Watch closely so they don’t burn! – check the bottom of a potsticker occasionally and adjust heat if needed.
  3. Turn heat to LOW. Stand back and use one hand holding the lid as a shield, as you pour 1/3 cup chicken broth around the dumplings then quickly place the lid on. You can even remove skillet from heat for 30 seconds if this will make you more comfortable against splattering.
  4. Cook until chicken broth has completely evaporated. Remove lid, increase heat to medium and cook 1-2 additional minutes to crisp up bottoms. Transfer potstickers to a paper towel lined baking tray. Repeat until all potstickers are cooked. Best served warm with Dipping Sauce.

Dipping Sauce

  1. Whisk together Dipping Sauce ingredients. Add chili sauce to taste if desired.


Recipe Notes

Wrappers

  • Most grocery store carries them, they will be located in the refrigerated section, sometimes in produce.  If you don’t see them, make sure you ask someone before you give up.  If your grocery store doesn’t carry them, then you can find them at an Asian market or use wonton wrappers (info on that below).
  • You can substitute round dumpling wrappers with square wonton wrappers and cut them into an approximate 3.5” rounds using a cookie cutter or place an object measuring 3.5” on wrappers and cut around with a pizza cutter.
    • If you are cutting the wonton wrappers, cut multiple at a time so it goes more quickly.  When cutting, immediately place cut wrappers back in a sealed bag or cover with a damp cloth/paper towel and only remove wrappers as needed so the rest stay covered in the package otherwise they will dry out.
    • You can also leave the wonton wrappers square and then fold in half to create a triangle. You may need to adjust the amount of filling and broth used as wonton wrappers are thinner.

How to Prevent Potstickers from Tearing

Cover wrappers: 

  • Keep the dumpling wrappers covered in their packaging when not using or else they will dry out and tear easily.
  • Remove liquid from filling: Salt cabbage and push out as much liquid from the cabbage as possible. Excess liquid will cause the wrappers to get moist and tear easily.

Remove air: 

  • As you are folding and pleating your potstickers, push out any excess air otherwise they can tear as they cook.

Tight pleats: 

  • The pleats should be pinched tight without any holes or else the potstickers with suck up to much moisture when steaming and tear.

Cover potstickers: 

  • Assembled potstickers should be placed on parchment paper and covered with a clean damp towel to keep them moist and fry drying out.

Nonstick Skillet: 

  • Potstickers will stick to your skillet and tear when you try and move them unless you use a nonstick skillet.

Notes for a Perfect Potsticker:

  • DO NOT rinse mushrooms or else they will suck up water and make the Potsticker filling wet and your Potstickers soggy.  Instead, brush off any dirt with a damp paper towel if needed.
  • Don’t overfill potstickers: depending on the size of your dumpling and your folding method, you may fit less filling – that is perfectly fine – you want to generously fill your potsticker but not to the point it can’t close filling.  Use less filling if you are having a problem easily sealing your potsticker.
  • Don’t overcrowd your pan – the dumplings will expand as they cook and you don’t want them to expand into each other and stick. You also want to give them space so the full surface of the bottom of the potsticker is touching the pan so it can crisp up.
  • Check for golden bottoms: Don’t be afraid to peak underneath your dumplings to see if they need a little more time, are properly golden or are cooking too quickly.  Adjust cooking time or temperature accordingly.

Check a few dumplings: 

  • Sometimes your pan can cook unevenly, so check a few dumplings for doneness.

Check for doneness: 

  • After the chicken broth is evaporated, you can check a dumpling to ensure the pork is cooked through.  If not, add a few more tablespoons broth, cover, and cook on.  The amount of chicken broth can vary depending on the thickness of the wrapper.

Don’t rush the crisping: 

  • While the dumpling will brown in the first step, they will only get crispy when all the chicken broth is evaporated. If the bottoms aren’t browning to your liking, then drizzle in a little more vegetable oil and shake th pan back and forth to evenly distribute the oil.

How to Freeze Potstickers

  • Assemble the potstickers according to directions up to refrigerating.
  • Place uncooked dumplings on a parchment lined baking tray so they are not touching.
  • Wrap the tray tightly with plastic wrap, and freeze for 1-2 hours (until potstickers are solid), transfer potstickers to a freezer bag to save space.
  • Freeze for up to 3 months.
  • When ready to cook, DO NOT THAW before cooking.  Take care when you add the potstickers to the pan because ice crystals may cause the oil to splatter.
  • Cook dumplings according to recipe directions except add 2 extra tablespoons of chicken broth.
  • After the chicken broth evaporates, check a dumpling for doneness, if it not cooked through add another tablespoon or of chicken broth to the pan and cook an additional minute then check again.